Sunday, January 24, 2010

Vegan Bake Sale for Haiti Today

I spent Saturday cooking for today's bake sale. I made thyme spiced mixed nuts, vegan rice crispie treats made with Dandies, and curry spiced cashews.

Come out to Ten Thousand Villages between noon and 4 PM to buy some treats and donate money to support relief in Haiti.

Curry Spiced Cashews

2 tablespoons non-hydrogenated margarine
4 teaspoons curry powder
1 1/2 teaspoons kosher salt
1/4 teaspoon cayenne pepper
2 cups roasted cashews

Melt margarine over medium heat. Add the spices and cook about 30 seconds or until fragrant. Take the pan off the heat and add the cashews. Stir to coat the cashews evenly with the spice mixture. Spread in a single layer on a rimmed baking sheet and bake for 10 minutes at 350 degrees F.

Wednesday, January 20, 2010

Austin Vegan Bake Sale for Haiti


Come out to Austin's vegan bake sale for Haiti this Sunday, January 24th, from noon to 4PM at Ten Thousand Villages (1317 South Congress Ave). All money raised will be donated to Food for Life Global.

Many thanks to Ten Thousand Villages for letting us use their space and to Wheatsville Coop for donating supplies.

In Texas, vegan bake sales are also being held in Houston and Denton. There's a growing list of vegan bake sales for Haiti on the Post Punk Kitchen blog.

If you're interested in baking for the Austin bake sale there's information on Facebook and this thread of the VRA.

Wednesday, December 23, 2009

CSA and Moving Update

Saturday morning, we picked up our CSA veggies. Look! Potatoes! And green onions!

Itty bitty thinned carrots! And carrot tops, which I use like parsley.


And turnips! Er, turnips. What do you do with turnips? (To start with, you refrigerate them. I learned the hard way.)


I thumbed through my eleventy-billion cookbooks and finally settled on Turnips in Mustard Sauce from How to Cook Everything Vegetarian. This cookbook is great for "what am I going to do with this?" cooking. And it didn't let me down.

I don't like to post recipes from cookbooks unless I change them significantly, but let's take a look at braising. Braising is great for root vegetables. Carrots, potatoes, beets, even radishes, are great braised. So no surprise that it worked well for turnips.

To braise, cut the vegetables into equal sized pieces so it cooks evenly. This can be hard with something knobby, but braising isn't about perfection. Brown the vegetables in a bit of oil. Sprinkle with some good old salt and pepper. Then add about a cup of flavorful liquid (I used vegetable broth this time, but wine works great, too) and simmer covered until the food is tender.

And here is the beauty of braising. After the food is cooked through, remove it to a bowl and leave the drippings in the pan. This is where the magic happens. Add a bit of starch to thicken (the recipe called for cornstarch, but the only starch I had was mystery bulk bin flour. Possibly spelt flour. Or maybe whole wheat pastry flour.) It doesn't really matter what starch you use, what does matter is that you mix it with a bit of liquid before adding it to the pan. This will prevent dreadful clumps from ruining your sauce. Add any seasonings you like (like mustard!), and cook until reduced to a thickish sauce.

Drizzle your pan sauce over the braised vegetables and sprinkle on whatever herbs you have on hand. Braises aren't always pretty, but a sprinkle of herbs will cleverly disguise this. (Jazz hands!) I used carrot tops. Because it's all I had.

We just moved into a new house, and the kitchen is the only room we haven't unpacked yet. Which is why I cobbled lunch together from some soggy unrefrigerated turnips, carrot tops, and mystery flour. But it was a tasty cobble, so don't hold it against the turnips.

Friday, December 18, 2009

Ode to Soup

1. black bean soup
2. yellow pea and coconut soup
3. squash soup
4. Asian-style cabbage soup
5. black bean soup
6. tortilla soup
7. squash soup
8. squash soup
9. broccoli soup
10. cashew butternut squash soup
11. Thai curry soup
12. matzah ball soup
13. tortilla soup
14. green coriander and ginger broth
15. cholent
16. rajmah

How to Roast an Acorn Squash

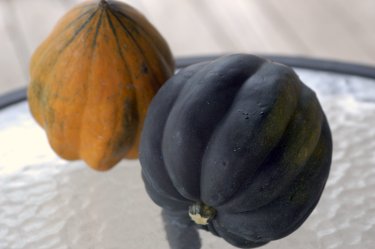
We finally got something besides greens and radishes in our CSA box. And rumor is that tomorrow's box will have potatoes! Acorn squash was one of the vegetables we ate a lot of when I was a kid. Even though it takes awhile for squash to roast in the oven, the easy prep work and clean up make this a great weeknight dish.

Step 1: Cut the acorn squash in half. You'll want to use a sharp knife for this. Start cutting at the end opposite the stem. Carefully work your knife through until the squash is only held together by the stem. Wiggle your knife a bit until the stem pulls off, sticking to one side of the squash.

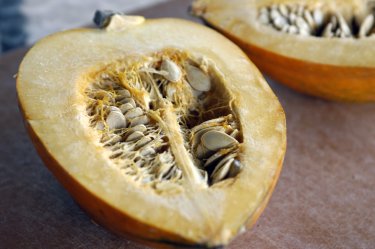
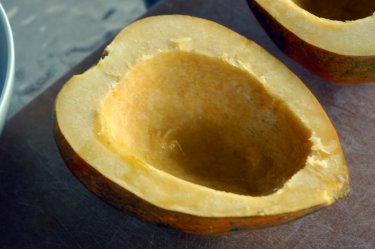
Step 2: Using a soup spoon, scoop out all the strings and seeds. You can separate the seeds later if you want to roast them. Don't worry if one or two strings remain. Eating the strings won't hurt you, it's just not the most pleasant texture.

Step 3. Drizzle the squash with a small amount of olive oil or put a small pat of EB in the cavity. Sprinkle with salt. You can also sprinkle a bit of brown sugar in the cavity at this point if you'd like. It makes a nice sauce with the squash juices and might encourage a reluctant squash-eater.

Step 4: Roast at 350-400 degrees for 45 minutes to 1 1/2 hours or until a fork easily pierces the squash. The amount of time the squash takes to cook depends on the size of the squash and the temperature of your oven. The squash cooks faster at the higher temperature, but I often cook something else in the oven at 350 degrees at the same time. Either temperature works.

What to do with the roasted squash?
1. Eat with a spoon. One half serves one person.
2. Add roasted nuts and a drizzle of maple syrup.
3. Scoop out the flesh, boil in vegetable broth, and then puree to make a soup. A bit of maple syrup is a nice addition to acorn squash soup.
4. Mash with a spoon and a bit of EB.
5. Use as a serving dish for grains like rice or quinoa.

Tuesday, December 15, 2009

Compost Bins: A Little Help

We're moving into a new house soon, and I'm taking this opportunity to improve my composting system. I grew up composting in side-by-side open piles contained by bricks or concrete blocks, and this is pretty much what I have now. It's a bit slow, but really easy. I want something more contained this time around. Our new back yard has chain link fencing, and an open compost pile isn't very pretty to look at. Also, contained composting systems break down the organic materials more quickly.

I'm not interested in buying a compost bin. I want to make something so I can tailor it to fit my needs exactly and so I can control the costs. My main concerns are cost and laziness (as in, I am lazy). The two homemade systems I'm seeing are

1) Chicken wire supported by poles. Pros: we have chicken wire that the previous owners left, and this is a pretty easy construction. Cons: In order to stir the compost, you have to move the wire structure, stir, and then shovel the compost back into the container. This is a bit of work, though not too bad if I'm only stirring once or twice a month (note: see laziness).

2) An old metal trashcan with holes drilled in it. Pros: Stirring is easy since you just roll the can on its side a bit. Cons: I would have to find an old metal trashcan.

Have you had any success building a compost system? Are you lazy, too? What works for you?

Saturday, December 12, 2009

Happy Chanukah!


We had two things to celebrate today: the second night of Chanukah and Dewey's reintroduction to fatty food after having his gallbladder surgery.


This is not my family's latke recipe. My mother grates her potatoes and onions (by hand!) into a paste, much like her potato kugel recipe. I love her latkes. But the race to grate all the potatoes by hand before they turn pink and then brown is too stressful for me. Dewey and I have our own latke recipe that's easier. It uses the food processor to cut the potatoes and needs only pantry staples.

Not My Mother's Latkes

3 large russet potatoes*
1 onion
4 tablespoons corn starch
4 tablespoons flour
salt and pepper
oil

Peel the potatoes and onion. Shred the potatoes in the food processor. Remove to a clean towel and squeeze to remove as much liquid as possible. Shred the onion in the food processor. Combine the onion and potato in a large bowl. Sprinkle with corn starch, flour, salt and pepper. Use your hands to combine. When you squeeze the potatoes with your hand, it should form a loose clump. Keep the potato mixture covered with a damp towel while you work to keep the potatoes from browning.

Heat about 1/2 inch of oil in a cast iron skillet on medium heat. Grab a handful of potato mixture. Squeeze, flatten, and then drop it carefully into the hot oil. Try not to crowd the pan too much. I can usually fit about four latkes into my skillet at once. Fry for about five minutes on each side, or until lightly browned. Remove to a rack to drain the oil. Repeat until done, draining any liquid that collects in the potatoes.

*It seems like you can only find giant russet potatoes at the supermarket these days. If you can find the much saner potatoes that are just about the size of a fist, use 4-6 potatoes.